Saddle Authoritarian!
My saddle fits… doesn’t it?
The world of saddle fitting is really beginning to change and this change is happening none too quickly in the opinions of the horses we ride. Saddle fitting has had little research documented until very recently. As professionals in the horse industry, we absolutely know that saddle fitting is an on‐going issue. If this was not the case, the ‘$1,000,000 Saddle Pad Market’ would not have developed! Thanks to Veterinarians like Dr. Kerry Ridgeway and Dr. Joyce Harman, the true art of saddle fitting is being taught and applied. Research is being done at the major universities to determine what truly is best for the horse. The old adage of “I’ve used this saddle for 30 years, as did my dad, and his dad before that” is no longer an acceptable reason to choose a saddle.
In my 13 years as an equine sports therapist, I rarely see a new client without asking to see the saddle that is being regularly used on that client. I have become known as a saddle authoritarian! Unfortunately, in most cases I encounter, the saddle rarely fits the horse it is being placed on. This practice of incorporating saddle fitting with every new horse assessment has answered many questions directly related to what I find in the soft tissue of the horse’s back. The most interesting part of saddle fitting is that it is now being linked to lameness that people never believed a saddle could cause. Foreleg lameness, suspensory lameness, neck problems, respiratory problems, collection problems, and of course sore backs are all noted as saddle fit related problems. I am beginning to see a shift in the awareness of horse owners and trainers when it comes to the tack that they put on their horses. However, it still seems that if a client has 10 saddle fitters come out that client is likely to receive 10 different opinions on the fit of that saddle. I have a firm belief that there is only one saddle fitting opinion that matters and it is the opinion of your horse. I have been humbled by many a horse that disagreed with the eye that I spent so much money to train.
Early in my career, I would tell people that the saddle fitted and the horse had an on-going attitude problem, or that the horse needed to work through some tissue damage that the old saddle created – most certainly there is still truth in both of those statements. However, when fitting a static object to a dynamic surface there is bound to be some snags along the way. One of the greatest teachers I have worked with started his saddle fitting lecture with this line “No saddle fits any horse”. As I listened to this opening statement I thought to myself, why in the world did I pay all this money to learn saddle fitting from this guy?! The truth of the matter is – the more I have learned about saddles, the more I realize that Dr. Ridgeway is bang on, and it is that dynamic surface – your horse’s back – that we should be the most concerned with. So I have written this article with the intent that you ask yourself and your trainer some questions regarding the saddle you currently use in your sport and you take a second look at the saddle you set on your horse.
At times, I am called out to see a horse that is ‘just not right…. not lame, but not right, doesn’t bend the same, seems tired, refuses to do things that before seemed so easy for him or her’. Often, the horse has developed behavioral problems that seem out of character. As I ask questions, I find out that the trainer really thinks this horse has hit his/her potential and should be moved on to a rider that will not ask so much of him/her. As this very well might be that case, I have had many happy owners hear that we should check some areas of this animal’s body before we move on to our next mount. One of the first things that I check is a horse’s saddle – not just the owner’s saddle but any saddle that is being used on the horse (this would also be followed up by a complete physical evaluation, but we will stick to the saddle fitting for this article). Very frequently, the trainer’s saddle is the culprit and as the horse usually works harder with the trainer than with the owner, there is related reaction from the animal.
I would like to present here some self-checks that can be done at home to evaluate your saddle and at least get you started in asking some questions of the tack you are putting on your horse. A professional saddle fitter will perform even more tests with their educated eye, so if you feel that something is not right with your saddle, a visit from a professional will be worthwhile. All of the following stationary evaluations must be performed on a horse that is standing square, on a firm flat surface, with his/her neck in line with the rest of the body.
1: My Horse’s Attitude
Does your horse try to talk to you when you are grooming or tacking him/her up? Does he/she turn around to bite you or at the rope or bars in front of him? Does he/she wiggle and move all over as the saddle is being brought to him/her? Does he/she stamp his/her feet or grind his/her teeth when being tacked up? Does he/she drop her back, fall to his/her knees, or look weak in the hind end when the girth is being done up? Does he/she throw his/her head into the air? Does he/she walk away from being tacked up and stiff and reluctant to move after the tack is on? All of these are ways in which your horse is trying to communicate that the tack is uncomfortable and should be checked.
2: The State of my Horse’s Back
Can you run your hands down your horse’s back with your horse having a comfortable reaction to it, just a soft movement – not blocking against your hand and not ducking away from the pressure. You should not see any fasciculation (muscle spasms), you should not see any swelling, ruffled hair, bumps, atrophy (muscle wasting), or white hairs. When you check your horse’s back after your ride, are the sweat marks even? Are there any dry spots? Can your horse still be touched comfortably?
3: Saddle ‘Square-ness’
A: Off the horse
Prior to tacking up, an evaluation should be made of the soundness of the saddle. Hold the saddle first pommel down and then cantle down to check the symmetry of the panels. Unless we are trying to fit a horse with an asymmetric back, these panels should look balanced. Secondly, check that the flocking is the same from side to side. Run your hands down the flocking and look for any holes or deviations that would cause a pressure point on your horse’s back. Next, set the saddle on a balanced saddle rack and check the symmetry in the stirrup hangers and the billets. I recommend you have a professional evaluate saddles for tree soundness before any purchase. These general checks will allow you to see any major asymmetries that may be causing both you and your horse problems.
B: On the horse
Some saddles look okay in an initial check, but once they are placed on the horse’s back, they just don’t sit balanced. It is important to evaluate the saddle sitting stationary on the horse and when the horse is moving to evaluate the natural resting position of the saddle. In the above example, we see a saddle that sits off to the right with the left panel nearly sitting on the left side of the horse’s spine.
4: The Saddle’s Position
Your saddle must sit behind the horses shoulder, in front of the last rib and with the girth billets at an appropriate angle. The saddle in the photo is set in the correct spot for this horse. Let’s talk first about placing the saddle correctly around the shoulder blade.
This is a hard concept to work into people’s minds, especially in the hunter jumper world. When asking many hunter jumper riders why they want the saddle so far forward, many say to get up off the horses back and to be forward with the jump. This is one of the myths that has been proven false with new research. The horse’s shoulder must be allowed to move; by placing your saddle on top of the shoulder blade you restrict the movement of the shoulder, the back, the neck, and the foreleg, all of which have soft tissue attachment along the scapula (shoulder blade).
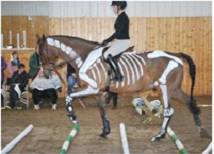
This picture shows an approximation of the horse’s skeleton. In restricting the movement of the scapula, you restrict the movement your horse will have over the fence and even worse, the horse’s ability to disperse your weight on the landing side of the fence. Some research suggests that a rider’s weight can be amplified by seven times coming down off a large oxer. To find the edge of the scapula, run your fingers horizontal to the ground along the shoulder and find the scapular spine that is sticking out. From here, move your fingers towards the horse’s barrel and you will fall off the ridge that is the back side of the scapula. Gently trace this line up and you will see where the scapula lies. The saddle’s tree points must be behind this bone. On a saddle that is very forward cut, the flaps may sit slightly on the scapula, but it is the saddle’s tree that must sit behind the shoulder blade. Our second position check is to determine if your saddle sits in front of the last rib. We can’t have a saddle’s panels sitting behind this point. Your horse doesn’t have any ribs left to support your weight past this point. To locate this last rib, run your fingers forward horizontally from the hip bone, press firmly but gently as to not dig into your horse and your fingers will run into this last rib. Once you have located this rib, run your had up along this bone towards the horse’s spine. This will be the location that your saddle panel can’t come past. All saddles have a natural sweet spot where they want to rest. The best way to find this sweet spot is to set the saddle way up on the shoulder and begin to gently rock it side to side moving it backwards. The saddle will stop in your horse’s sweet spot. All saddles try to work their way to this spot, no matter what pads, breast plates, cruppers, or special girthing systems we apply. You often see riders getting off and moving their saddle up half way through the ride and we know that this saddle is not being put where it should. The down side for the horse in all this is that it causes friction and pressure points in the tissue as the saddle is working its way to where it wants to sit.
Lastly, let’s discuss girth placement. It must fit into the horses anatomical sweet spot, far enough behind the elbow to allow a full range of foreleg movement, but in front of where the horses sternum ends. Most horses have a very slight concave girth sweet spot that you can stand back and view. Using the Pony Club Rule of 4 fingers of width behind the elbow doesn’t always work. I like to girth the horse up, lift the foreleg and swing it to see if the girth has any interference with the elbow, or if the soft tissue is being pinched.
5: Balance Point
This is a problem that I often see with saddles and it is the most misunderstood. The saddle must sit balanced so that the place where your seat bones sit is going to be level with the ground. Do not judge this balance by the height of the pommel and the cantle because with the changing seat styles, this can vary greatly. The balance on the horse’s back is important because it will dictate how your hip angle will be and it will also effect the rider’s weight distribution into the horses back tissue.
The above saddle’s balance point is slightly to the rear. If you look closely at the place where the rider’s seat bones would sit, this area of the saddle is angled rearward. This example is slight, however training your eye to recognize this is very valuable. People who do recognize a balance point imbalance have had a favorite fix in the past. That has been to simply pad up the saddle to make the seat sit properly. The challenge with this as a solution is that the angle of the tree is changed as the back of the saddle is lifted with pads, and it often simply shifts the weight forward, driving it into the shoulder blade, creating a whole new set of problems. Bulky pads also create pressure points if they are not adjusted properly and even when sat on correctly at the beginning of the ride, they often shift as the ride continues.
6: Rock
Not the music kind of rock, but the rock within your saddle! Lateral or longitudinal rock will create friction and pressure points in your horse’s back. To check for rock, set your saddle on with no pad on the spot on your horse’s back where you would normally ride. Press on the pommel and cantle and determine if when one is pressed down, the other bumps up. Next, gently pull from side to side to determine if the saddle is willing to roll very easily. You are looking to see if the saddle has too much movement. Because the saddle is not girthed up, you will be able to pull it around; you are looking to see if the saddle wants to move. If you suspect there is too much movement, have an assistant walk the horse and view what the saddle does on the horse’s back without aid of the girth. Girth the saddle up and do the same thing. If you see significant movement, you should ride in the saddle and have a trainer evaluate if the saddle shifts with the rider’s weight on a moving horse. You do not want the saddle to be creating a lot of friction in the horse’s back. Remember that the horse’s back is constantly moving and the saddle will flow with this movement; however we don’t want to see that the saddle is creating more movement than is being produced by the horse.
7: Gullet Width and Height
The gullet is the channel that runs down the middle of the saddle between the two panels. The gullet must span the horse’s spine the whole way down the saddle. In many of the older saddles, the gullet starts to get very narrow as you get to the back of the saddle.
Your horse’s spine does not narrow through the back and the spine cannot have pressure directly on it. The saddle above spans this horse’s spine correctly. To check this, set the saddle on the horse’s back with no pad and look down the gullet both from the back and the front to confirm that the panels are leaving enough room on each side of the spine. Ideally, there will be ample room so that the spine will not receive any pressure even when the horse is bent. Next, check whither clearance, as the saddle’s gullet cannot come into contact with the horse’s whither. This should be carefully evaluated, as some saddles appear to have a tall pommel, but when set on the horse and evaluated by looking down the gullet, it will be touching the whither further back. This should be evaluated both on and off the horse to ensure that when the rider’s weight is in the saddle there is still good clearance.
8: Tree and Twist Size
In determining if the tree of the saddle is the right size for your horse, we need to place the saddle on its sweet spot on the horse and evaluate how the tree points fit in the horse’s whither pocket. Your horse’s whither pocket is the soft tissue under the whither and behind the scapula. Take your flat hand and run it under the saddle from the pommel to the front flap. Your hand should pass through easily, not being halted by a pressure point; it should feel snug and even in pressure. The angle of the front flap should match that of the shoulder. Next, push your hand up under the flap and run your flat hand along between your horse’s back and the saddle’s panels. You should feel the same even steady pressure. If you feel a space in the middle of the panel that does not contact your horse’s back, it is referred to as bridging. Bridging causes uneven weight distribution. A saddle professional will be able to evaluate this more thoroughly; however developing a feel of this for your own self is a great skill to have.
9: Panel Shape
The last thing you should check is if the saddle’s panel shape matches that of the horse’s back. The below saddle is made for a horse that has an angled back and you can see when it is placed on this horse with a flat back the outer surface of the panel has more pressure while the inside surface of the panel is not in contact with the horse’s back. This will affect the weight distribution of the panels and create pressure points.
10: Great saddle, but is it great for my horse?
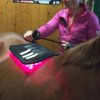
Sometimes we have a great saddle and it checks out in all the evaluations but your horse is still not happy – it is now time to try the white pad test! Take a clean white saddle pad and chalk your horse’s back and then very carefully set the pad and saddle on the horse’s back and ride for about 20 minutes.
The pad will pick up the chalk and give you a correct reading of what pressure points the saddle is creating when the horse is in motion. This test is explained in depth in Dr. Kerry Ridgeway’s DVD; “Saddle fitting from A to Z.” This is also the time to call in a professional to evaluate your saddle. A professional can try to find the problem and help with the solution.
As mentioned earlier, saddle fitting is an art. Even with a perfect fitting saddle, the rider’s postural or weight imbalance can create a deviation in the saddle that will affect your horse’s back. Your trainer will be your greatest asset in evaluating your personal posture. I think that every horse should have his or her saddle fitted to them to allow them to perform at their very best. A professional saddle fitter is the very best, however it is the owner’s responsibility for the well-being of their horse and even with a professional’s opinion, each rider and trainer should have a knowledge base of their own to draw from. I would highly recommend Dr. Kerry Ridgeway’s DVD “Saddle Fitting From A to Z” and Dr. Joyce Harman’s book “The Horse’s Pain-Free Back and Saddle Fitting Book” as excellent reference sources of reference in saddle fitting.
About Tina – The Saddle Authoritarian
I have made it a point to seek out and train with the best in the equine industry; people like Dr. Kerry Ridgeway, Dr. Hilary Clayton of Michigan State University, Debranne Pattillo, Jim Green, Dave Collins, Dr. Steven Wickler of Cal‐Poly University, Dr. Deb Bennett, Ruth Mitchell, Gail Wetzler, just to name a few. I would also like to thank the greatest teachers of all – THE HORSES!
To know one soul has breathed easier because of my work is to have succeeded!
www.inhandequinetherapy.co and have